Introduction
First and foremost we want to give a huge thank you for purchasing this WordPress Theme. We greatly appreciate your feedback from you on how, if anywhere, you would like this documentation imporved. If you have any further question, please kindly contact to us via our Helpdesk
Ri iOne Wordpress theme is a WooCommerce Wordpress theme designed and developed for use with Wordpress 4.2.2 or higher. The code was written to be backwards compatible where possible, however we recommend you use the current WP version when possible. If you are not using WordPress 4.2.2 or higher and can upgrade your site we recommend you do this before installation.
Although every effort has been made to ensure the theme is bug free and easy to use there is always a chance errors may occur. If you do find a problem please notify us immediately through our Help Desk so we can ensure it gets fixed as quickly as possible.
Help & Support
First of all if you are all new to WordPress, I would recommend to learn a little bit about it before you get started. Here are some nice Resources on how to get started with WordPress:
- WordPress FAQ: http://codex.WordPress.org/FAQ_New_To_WordPress
- Full Installation Guide: http://codex.WordPress.org/First_Steps_With_WordPress
- WordPress Video Tutorials: http://wp.tutsplus.com/sessions/wp101-basix-training/
- Download: Ri iOne
- Live Demo: http://wp.rivertheme.com/ri-ione/
- Online Documentation: http://doc.zootemplate.com/ri-ione/
- Help Desk: http://support.zooextension.com
- Include as many information as possible to explain your issue.
- Your URL.
- Name of the Theme.
- Your WordPress version.
- If you installed extensions, specify which are these.
What do you get?
Once you have made the purchase you will find our product in your ThemeForest Downloads page. Click on Download and you will a dropdown will popup with following options :
- All Files & Documentation
- Installable WordPress File Only
- License Certificate & Purchase Code (PDF)
- License Certificate & Purchase Code (text)
We recommend to download all files & documentation (the package) however you can simply download installable WordPress file only if you just want the WordPress Theme file.
The Folder Structure
Once you download the package, unzip it and you will find it contains the following folders.
- readme.txt
- documentation – This folder contains the documentation for the theme.
- themes-files - This folder contains the installable theme files.
- ri-ione.zip installable WordPress theme
- ri-ione-child.zip The child theme for Winnes WordPress Theme. The child theme is only for users who make code changes.
Installation
To install this theme you must have a working version of WordPress already installed. For information in regard to installing the WordPress platform, please see the WordPress Codex - http://codex.wordpress.org/Installing_WordPress
Pre-Installation Requirements
- WordPress 4.3.1 or higher and PHP 5.3 or higher;
- To avoid problems with demo content import you must be sure that file_get_contents() function is enabled in the server configuration;
- Recommended memory_limit is no less than 64M;
- upload_max_filesize should be no less than 20M.
Theme Installation
When you are ready to install a theme, you must first upload the theme files and then activate the theme itself. The theme files can be uploaded in two ways:
- FTP Upload: Using your FTP program, upload the non-zipped theme folder into the /wp-content/themes/ folder on your server
- WordPress Upload: Navigate to Appearance > Add New Themes > Upload. Go to browse, and select the zipped theme folder. Hit “Install Now” and the theme will be uploaded and installed.
Using Wordpress Theme Upload
- Login to your WordPress admin.
- In the Appearance > Themes menu click the tab "Install Themes"
- At the top of the page click, "Upload", then click the file input to select a file.
- Select the zipped theme file, "ri-ione.zip" available in theme-files folder from the package downloaded from ThemeForest, and click "Install Now"
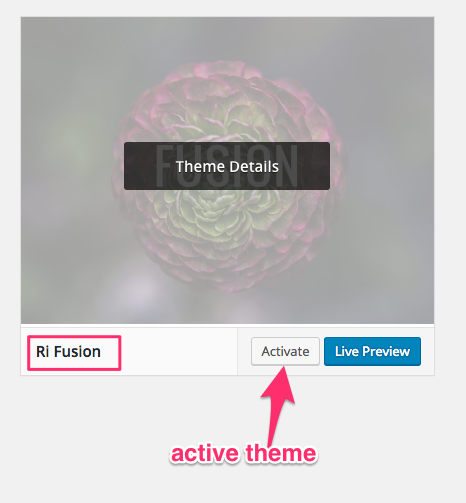
- After installation you will receive a success message confirming your new install.
- Click the link "Activate"
FYI, Please see the video bellow

FTP Upload
- Login to your FTP server and navigate to your WordPress themes directory.
- Normally this would be "wp-content/themes"
- Extract the files from the zipped theme available in the package downloaded from ThemeForest.
- Copy the folder "ri-ione" to your themes directory.
- After the files finish uploading, login to your WordPress admin.
- In the "Appearance" menu click "Themes"
- Click "Activate" for the theme "ri-ione"
Once the theme is uploaded, you need to activate it. Go to Appearance > Themes and activate ri-ione.
Plugin Installation
First of all, we would like to specify that we do not guarantee the compatibility of our theme with all the third-party plugins for WordPress . Our template is fully compatible only with the plugins that are included in our theme . You often (not always) need to customize the extension to make it work properly with your theme. It's impossible for theme author to make the theme compatible with all existing extensions. Please, take that into your consideration and treat with understanding!
After you had activated the theme, you need to install the plugins required by the theme. This theme comes bundled with many plugins. Some are required and some are optional.
Contact From 7 — Allows you create contact forms.
Envato Wordpress Toolkit — This toolkit plugin establishes an Envato Marketplace API connection to take advantage of the new wp-list-themes & wp-download methods created specifically for this plugin.
Rit Core - Rit Core is a simple, truly extensible and fully responsive options framework for WordPress themes and plugins.
WPBakery Visual Composer - This is a drag and drop frontend and backend page builder plugin that will save you tons of time working on the site content. This is a premium plugin and comes bundled with your theme.
Instagram Feed
Meta Box
Regenerate Thumbnails - Allows you to regenerate your thumbnails after changing the thumbnail sizes.
Slider Revolution - Allows you to create a responsive(mobile friendly) or fullwidth slider with must-see-effects and meanwhile keep or build your SEO optimization. This is a premium plugin and comes bundled with your theme.
WooCommerce — WooCommerce is a powerful, extendable eCommerce plugin that helps you sell anything. Beautifully.
Woocommerce Product Filter
YITH WooCommerce Wishlist — Allows you to add Wishlist functionality to your shop.
Installation
- At the firts time you install the theme, you'll see a notice about required plugins for this theme, to proceed click "Begin installing plugins".
- On clicking on it, you will be redirected to Install Required Plugins Page. Alternatively this page can be accessed from Appearance > Install Plugins as well.
- You will now see a list of plugins required and recommended for use with this theme. Click on the Select All checkbox to select plugins.
- Click on Bulk Actions dropdown menu, choose Install dropdown option and click the Apply button.
- If all plugins are installed successfully, you will be redirected to WP Plugins page.
- In case you encounter any problems, try installing theme one by one.
- After you have installed all the plugins, activate them by navigating to Plugins page, select the required plugins, choose activate from the dropdown option and click on Apply button.

FYI, Please see the video bellow

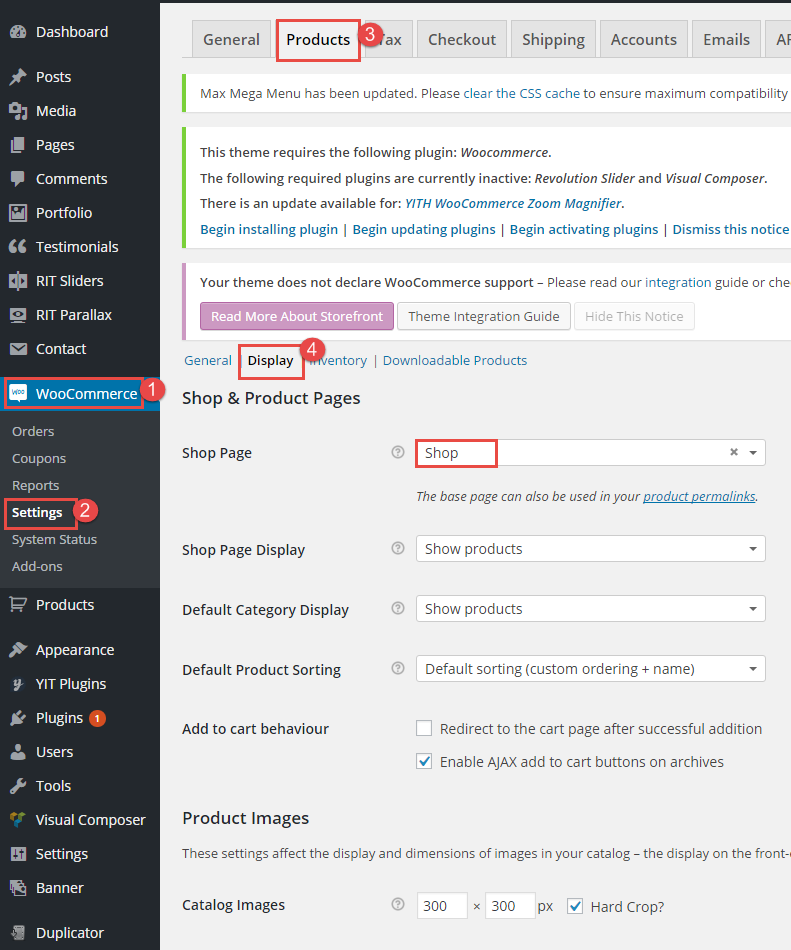
Change image sizes
This theme uses image sizes other than WooCommerce normal sizes. Go to WooCommerce > Settings > Products and change sizes to these:
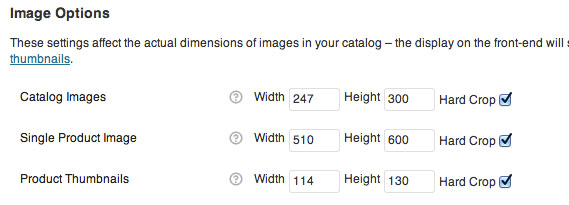
Note: You dont have to use the same heights. But its recommended to use the same widths
Regenerate thumbnails
After image sizes are set, you'll need to resize all images. We can do this automatically with the plugin: "Regenerate Thumbnails".
- Go to Tools > Regen. Thumbnails
- Click Regenerate All Thumbnails
You'll need to install "Regenerate Thumbnails" if you cant find it under Tools.
Update Theme/Plugin
How to update the theme?
Update using FTP
Please note: make a backup of the theme prior to updating.
The theme is located in wp-content/themes/ri-ione.
Go to http://themeforest.net/downloads to download latest version of the theme. The theme is located inside the downloaded zip in "Theme files" folder.
Unzip the theme zip file (ri-ione.zip) into wp-content/themes/ folder. Make sure this folder is named "ri-ione" (replace with old).
It seems scary but you really won’t loose any of your data. The only exception is if you have made edits to theme files like header.php, footer.php etc. These changes will need to made again to the new files. But all of your content and theme settings are preserved.
Update using WordPress Envato Market (Automatic Updates)
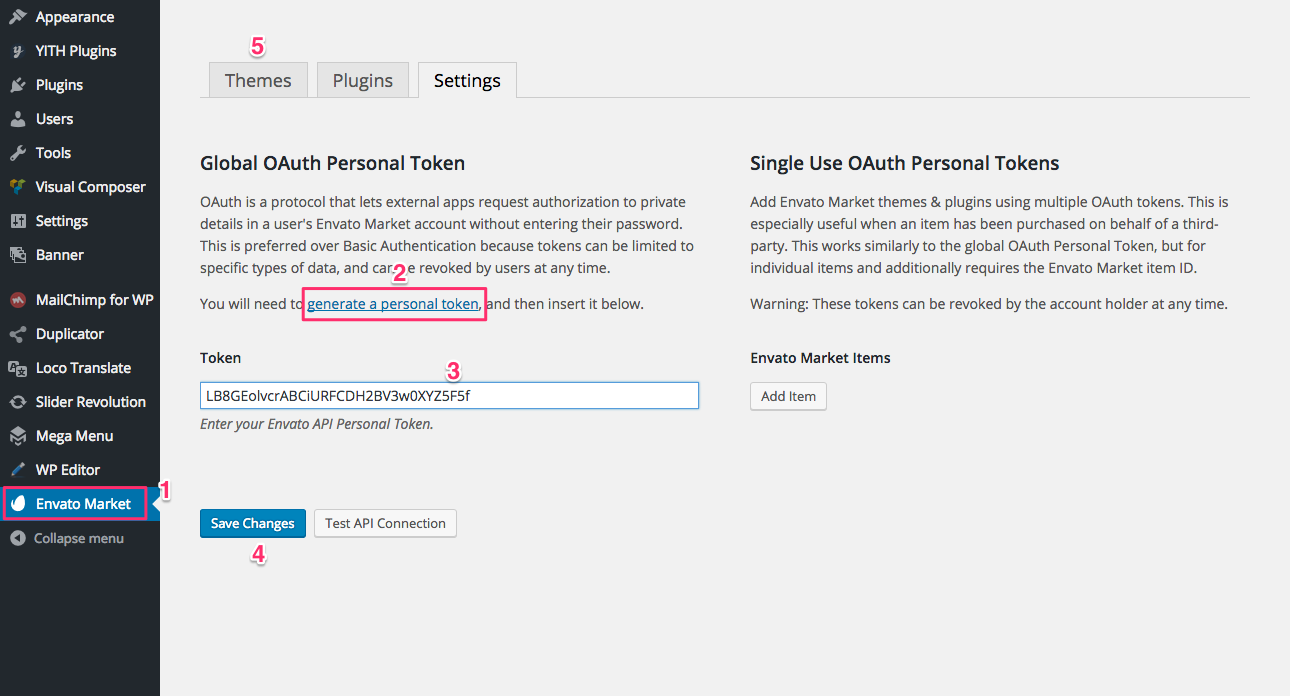
The Envato Market plugin can install WordPress themes and plugins purchased from ThemeForest & CodeCanyon by connecting with the Envato Market API using a secure OAuth personal token. Once your themes & plugins are installed WordPress will periodically check for updates, so keeping your items up to date is as simple as a few clicks.
You can add a global token to connect all your items from your account, and/or connect directly with a specific item using a singe-use token & item ID. When the global token and single-use token are set for the same item, the single-use token will be used to communicate with the API.
Step 1: Installing the Envato Market pluginThe latest version of the Envato Market plugin can be downloaded from the gh-pages branch as a WordPress installable package. DO NOT click the Github "Download ZIP" button, this plugin is meant to be installed in the WordPress plugins directory as envato-market and Github will not package the plugin correctly.
- Download the
envato-market.zipand unpack the archive. - Upload
envato-marketto the/wp-content/plugins/directory. - Activate the plugin through the 'Plugins' menu in WordPress.
- Click the 'Envato Market' menu in WordPress and connect to the API.
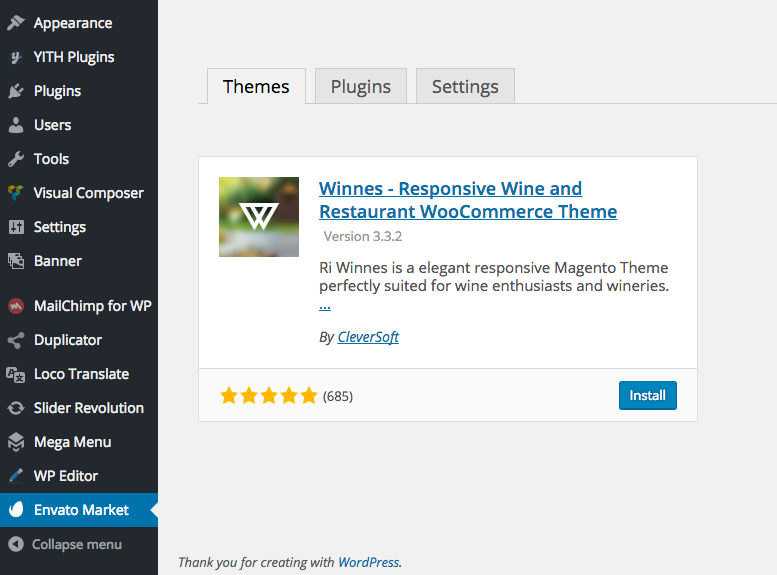
You should now be connected to your Envato account, and ready to update the theme:
- Click the Themes tab on top of the page.
- And finally, click the Install link in the notification box to update to the latest version.
Update Plugin
When the new versions of the theme integrated plugins are available, they are always included in the latest theme update. We always include plugin need update in the wp-content/themes/ri-ione/lib/plugins.
This guide only apply for Requires plugin update (with Rit Core, Revolution Slider, Visual Composer). We will tell you how to update plugin then please follow the same procession to update Rit Core and Visual Composer. To update Revolution Slider from older version, please follow this steps:
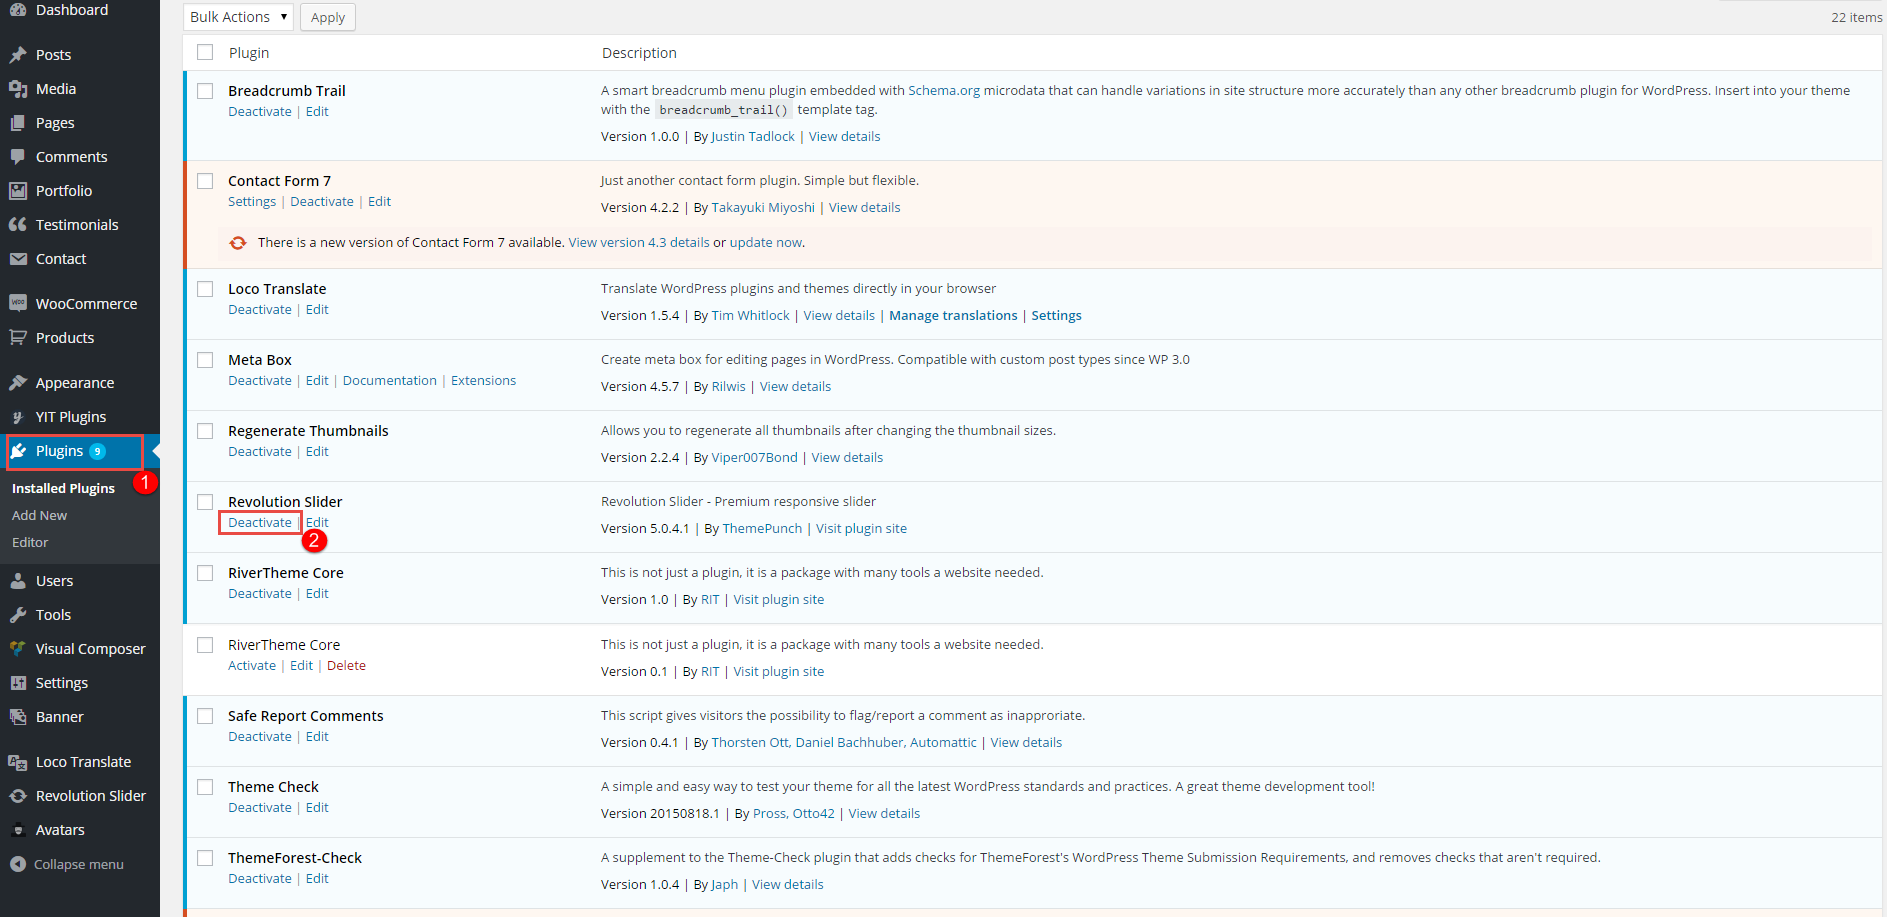
- Navigate to the Plugins and Deactivate Revolution Slider.
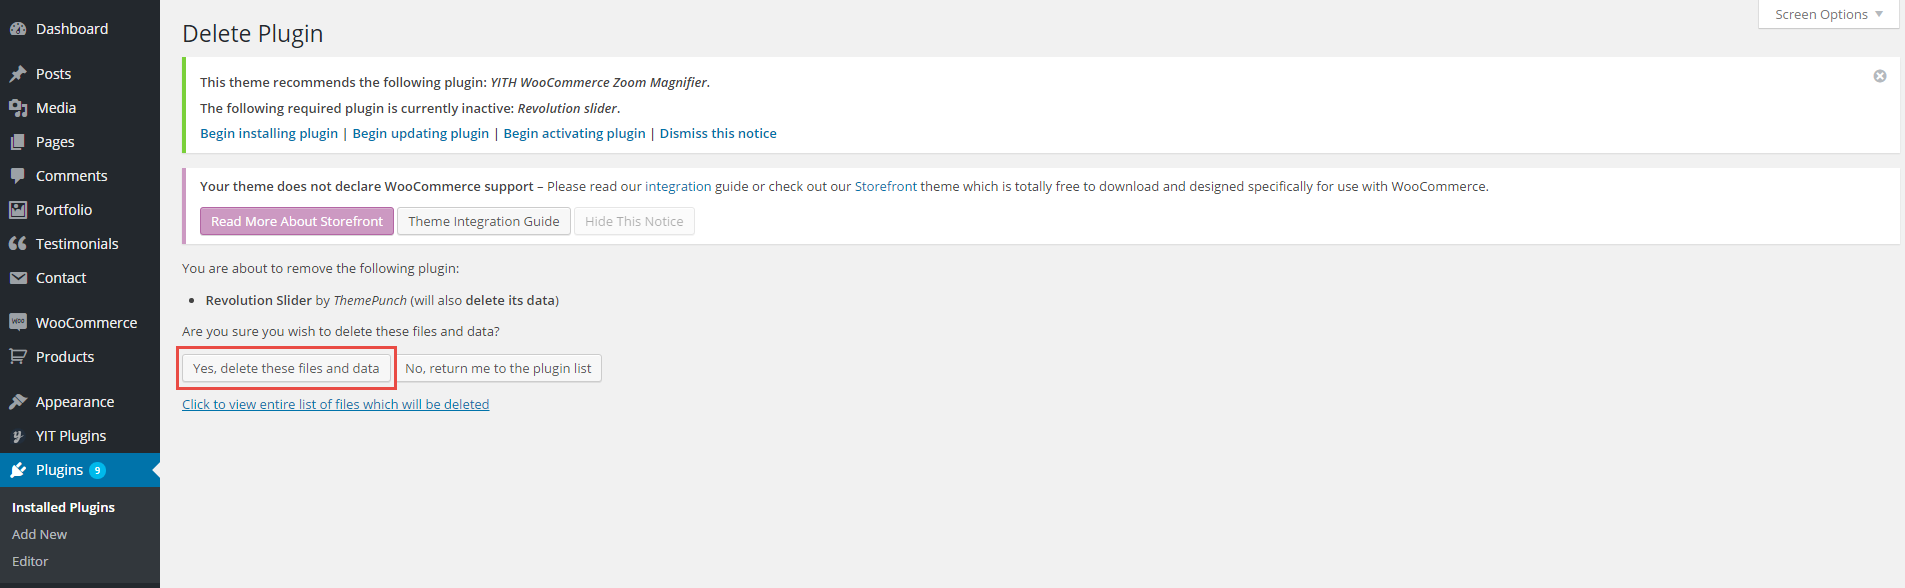
- Delete Revolution Slider Plugin.

- Then click to Begining Installing Plugin . Activate Revolution Slider following Installed Plugins step guiding above.
Child Theme
Fusion’s main download folder includes a child theme. A child theme is a theme that has all the functionality and styling of another theme; referred to as the parent theme. Child themes are the recommended way of modifying the code of an existing theme, since a child theme preserves all custom code changes and modifications; even after a theme update. If you modify code directly from a parent theme, and then update the parent theme, your changes will be lost.
Although child themes can be a great way to add custom changes to Fusion, they are most often used to customize core code taken from the parent theme. Because of this, please be aware that customizations of this nature fall outside our scope of support, and we will be unable to assist you with any issues that may arise. The Fusion child theme is primarily inserted in the package for developers’ convenience.
Always use a child theme when modifying core code. Child themes can also be used for custom CSS applications, template file modifications, and custom PHP functions and/or hooks. There are two ways to modify a child theme. Bear in mind that using child themes is no guarantee that an update of custom code on the parent theme will not require further maintenance.
Note: If you want to make changes in theme’s templates or functions, we recommend that you install child theme and make changes there. To learn more about the purpose and basis of creation of child theme, visit WordPress Codex on http://codex.WordPress.org/Child_Themes.
Import Demo Content
When you first install any WordPress theme, it will not contain all the extra content that you might see in the live demo. Now you don't have to import demo data to your site manually. We already built an advance feature called 1 Click Demo Importer. This features improves import just in few clicks. Please note that when you install base demo content doesn't include Home Page or the slider revolution import. We will step by step introducing on how to set them up.
- Install demo content just in few clicks will import:
- Customize
- Widget
- Menu
- Post
- All Pages(exclude Home Page)
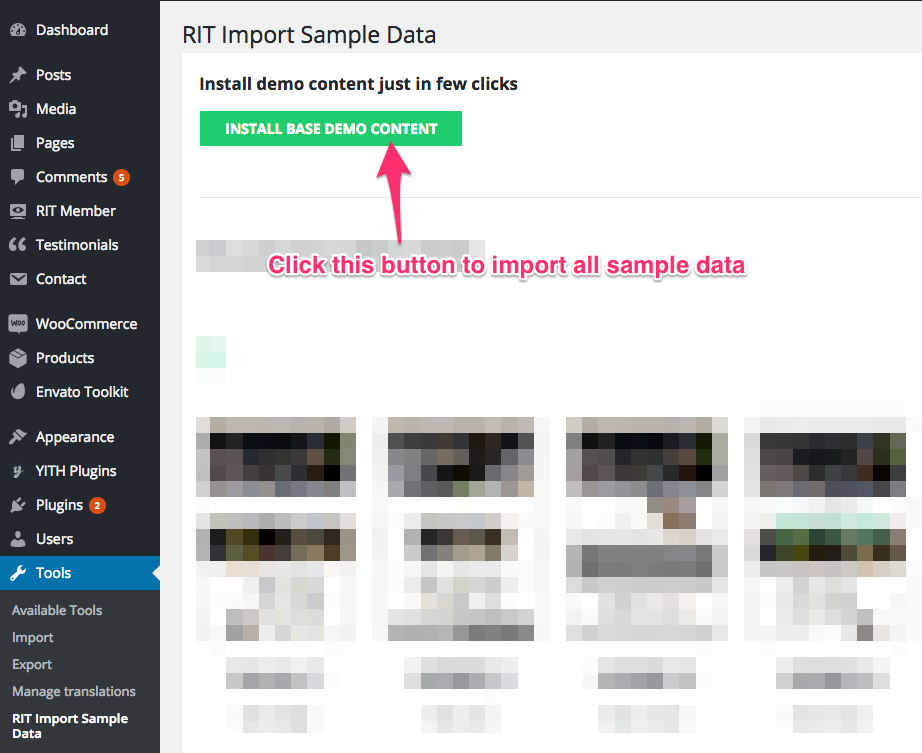
- Go to the WP Admin Panel > Tools > RIT Import Sample Data
- Click on Install Base Demo Content.
- This step will install only content of page and revolution slider which you chosen.

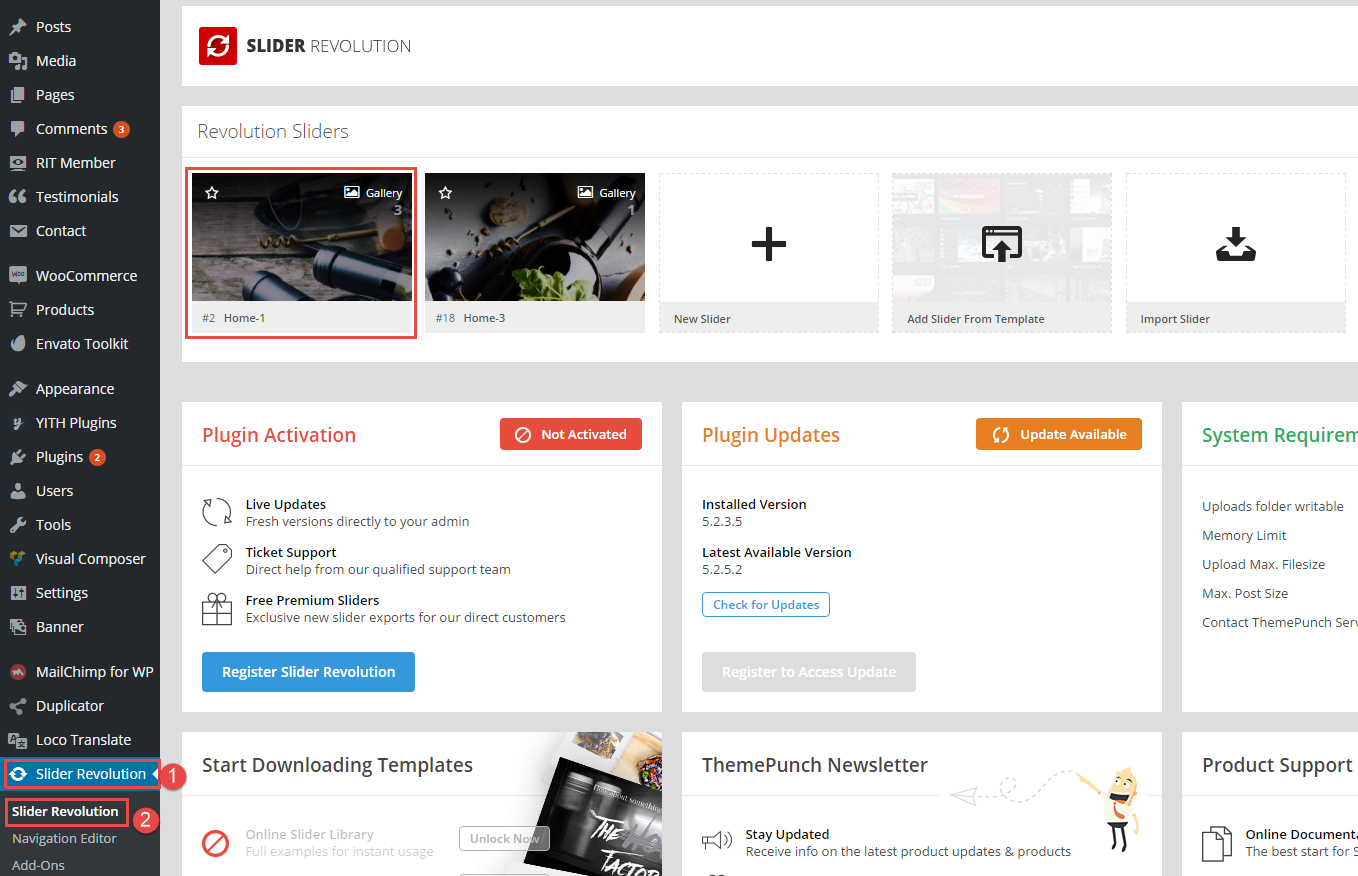
- When you go to Revolution Slider in the left side menu then you will see Slider imported.
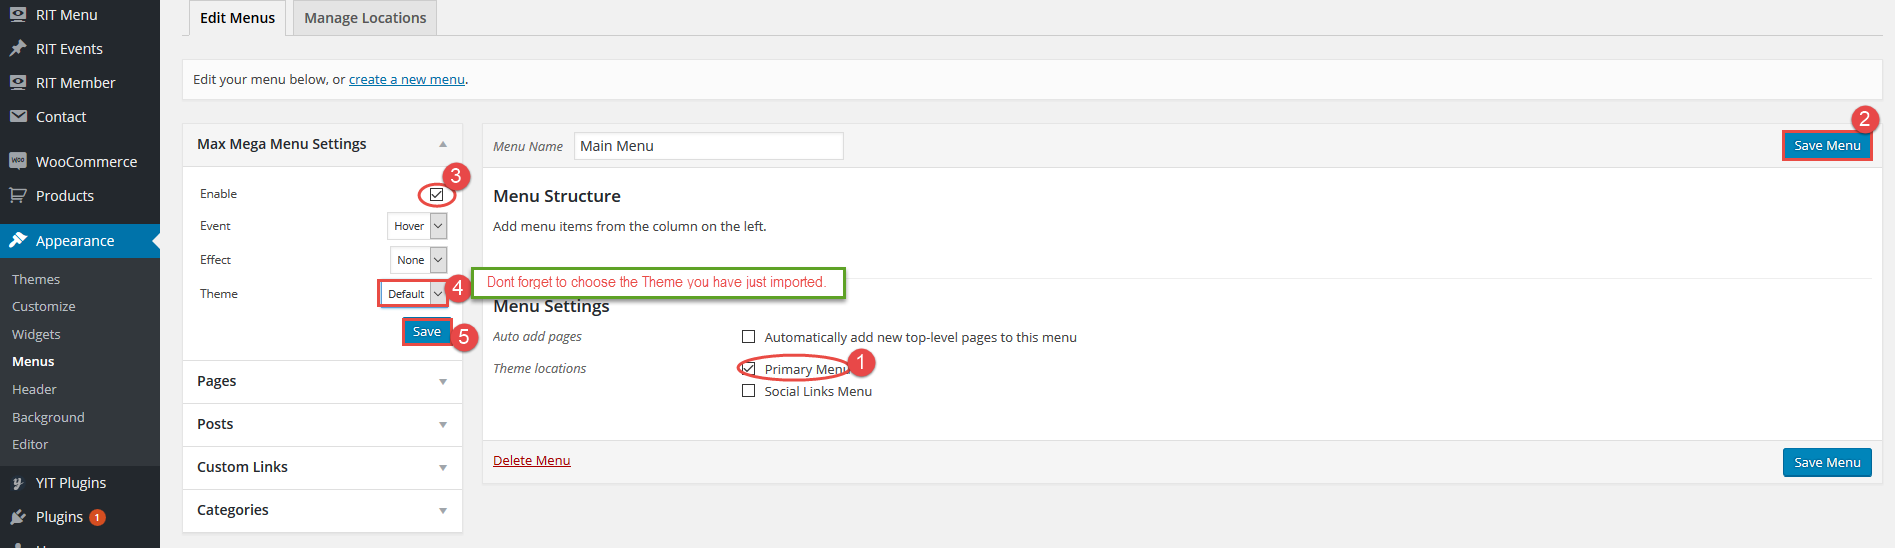
- Now make sure to select the Menu in Appearance > Menus and choose below options for set up menus as demo page:
Data processing which takes about five minutes. You will not be able to do any operation while you are waiting.

After finished import demo content, you can choose one of Home layout style. Now please choose any Home Page and click Install.
Theme Settings
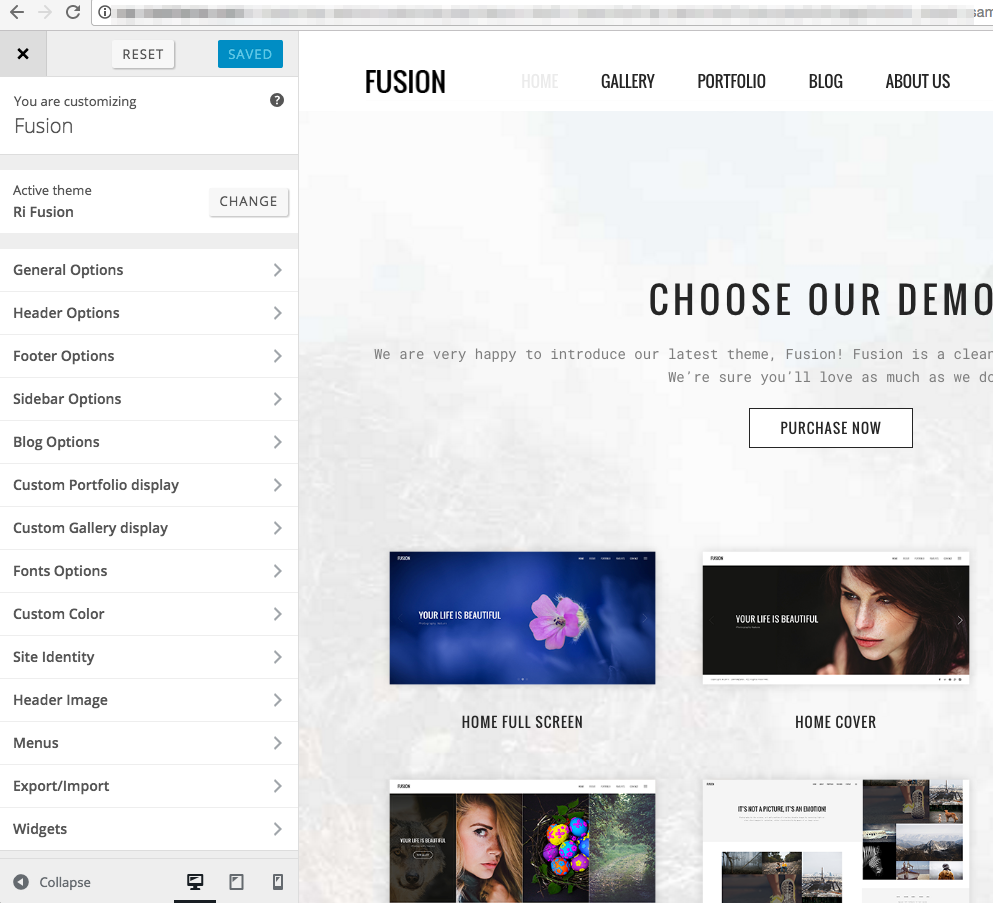
This theme takes advantage of the WordPress Live Customizer, where you can tweak all design-related settings and see the effect of the changes on the fly. Use it to preview and modify many of your site’s appearance settings, significantly improving the way you work with the theme.
To start using the Customizer, please go to WordPress Admin > Appearance > Customize. In the Customize panel you will see the following tabs:
Note:
- After each step, do not forget to choose Save & Publish to apply your configuration
- Options in these parts have lower priority than ones in Page, i.e options in Customize are are default configuration for Page.
Uploading your logo
By default the theme displays the site title in the Header Theme Area. You can easily change it and display the logo image instead by following these simple steps:- Open the WordPress Admin › Appearance › Customize > Site Identity
- Upload the desktop logo and set its width and height
![]()
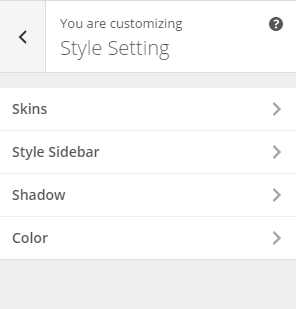
Style Settings
- Navigate Appearance > Customize > Font Options & Color Options
- You can customzie Style Setting through Skins, Fonts, Size and color.
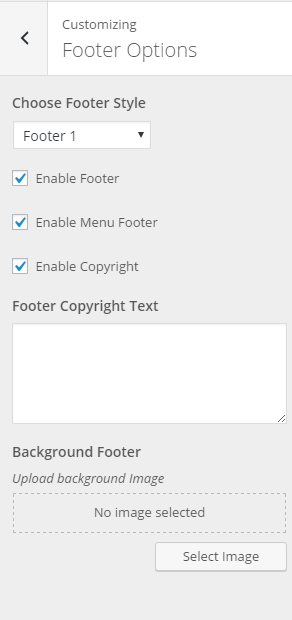
Footer
- Navigate Appearance > Customize > Footer
- Do some settings as the following image:
Header
Layout
- To configure the theme's Header settings, navigate to WordPress Admin > Appearance > Customize > Header Options
- To change the header layout, edit the Header Layout setting.

This theme includes multiple pre-configured header layouts to choose from. Each with it’s own look and set of options that allow you to customize it to fit your site design.
The height for the logo area is 120px as standard including top and bottom spaces , but you can override this in the Theme Options panel. If you upload an image with a bigger height than this, it will automatically be scaled to fit. The logo area has a maximum size, as to keep the menu items correctly placed. If you upload an image with a smaller height than this, you may need to add top spacing to get it vertically centered.
Header Transparency
To enable the header transparency for specific page, scroll to Page Options and check Enable Header Transparency.

Creating Menu
This WordPress theme uses WordPress built-in menus feature which can be found in your WordPress Dashboard > Appearance > Menus. This theme has 3 menu locations
- Off Canvas Menu (Mobile Menu) (Currently set to: Primary Menu)
- Primary Menu
- Primary Menu for Header Logo Center
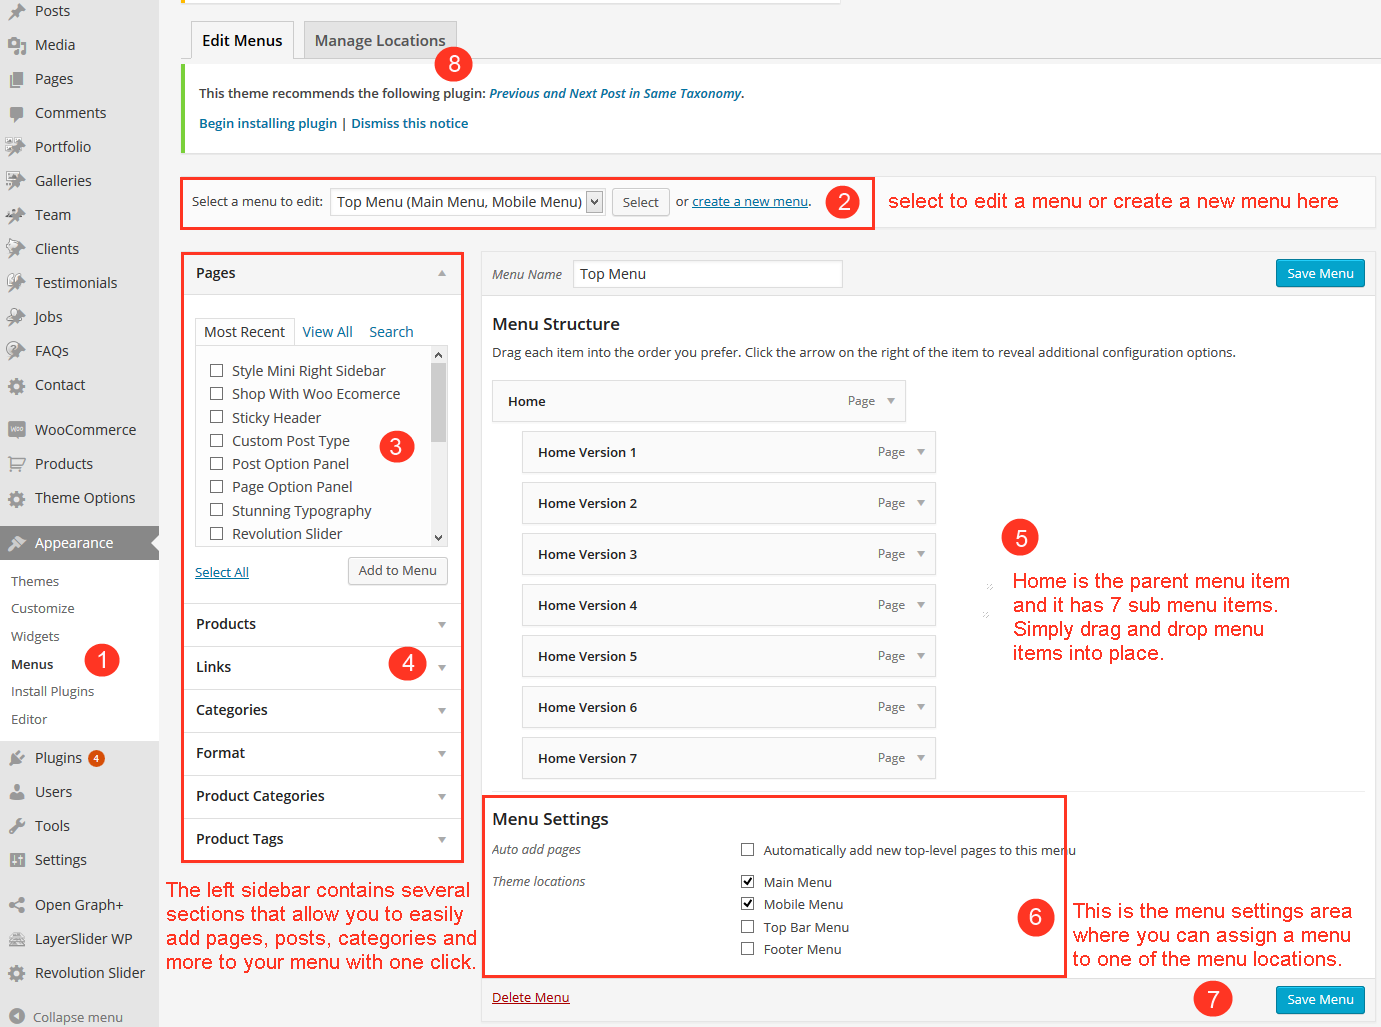
- Navigate to Appearance > Menus page
- Click the Create a new menu link to make a new menu. Enter the name then hit Create Menu.
- To add a menu item, you can easily select one of your already made pages on the left hand side and click Add to Menu.
- You can also add menu items by entering a custom name and custom link into the Links box.
- You can manage your menus using the drag and drop functionality. To create a dropdown menu, simply drag a menu item below and slightly to the right of another menu item and it will lock into place and create a dropdown section.
- After setting up your menu, select the menu you just created as the Primary Navigation in the Menu Settings and Create a new menu and select it as the Top Menu Navigation in the Menu Settings.
- Once its all done, make sure you click the Save button.
- You can change menus locations in any time from Manage Locations tab .
- Once you've created your menu, you need to assign it to the menu location which you would like to use it for. You can do so by setting it under the Manage Locations tab.
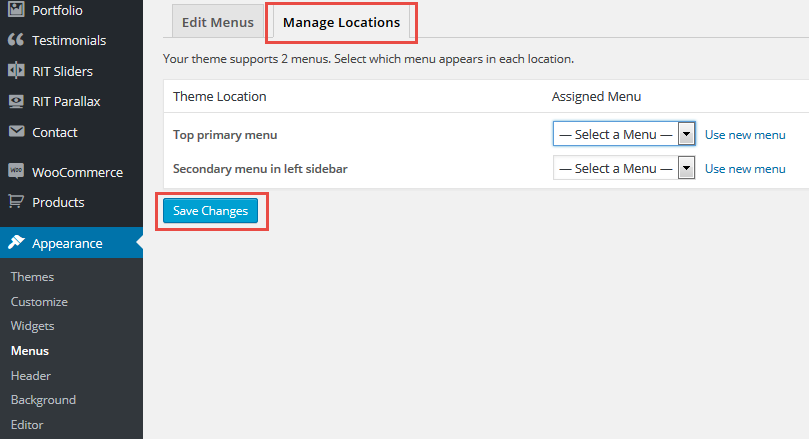
- You can also set the top header menu, and footer menu here, so if you would like to use both make sure you create a menu for each area.
Mega Menu
Mega Menu functionality is built-in to Ri iOne, so you can easily create mega dropdowns without any extra plugins or configuration. All you need to do is create a menu that goes into 3 tiers. You can have as many items with a mega menu as you like. Menu items that only have one level of children will show a standard dropdown. The image below shows an example of the setup for a mega menu, and the front end output:
- Structure:
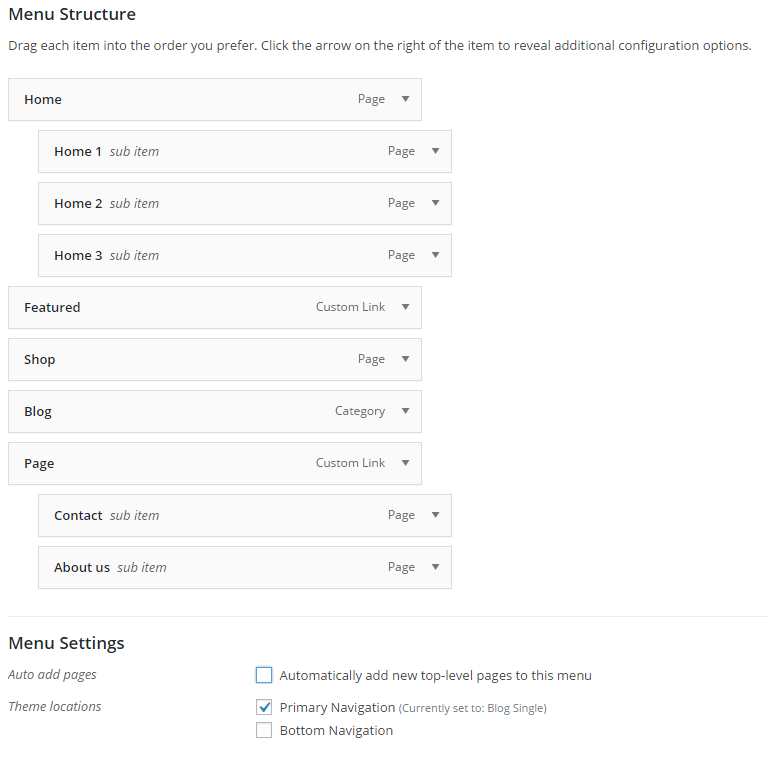
- Output:
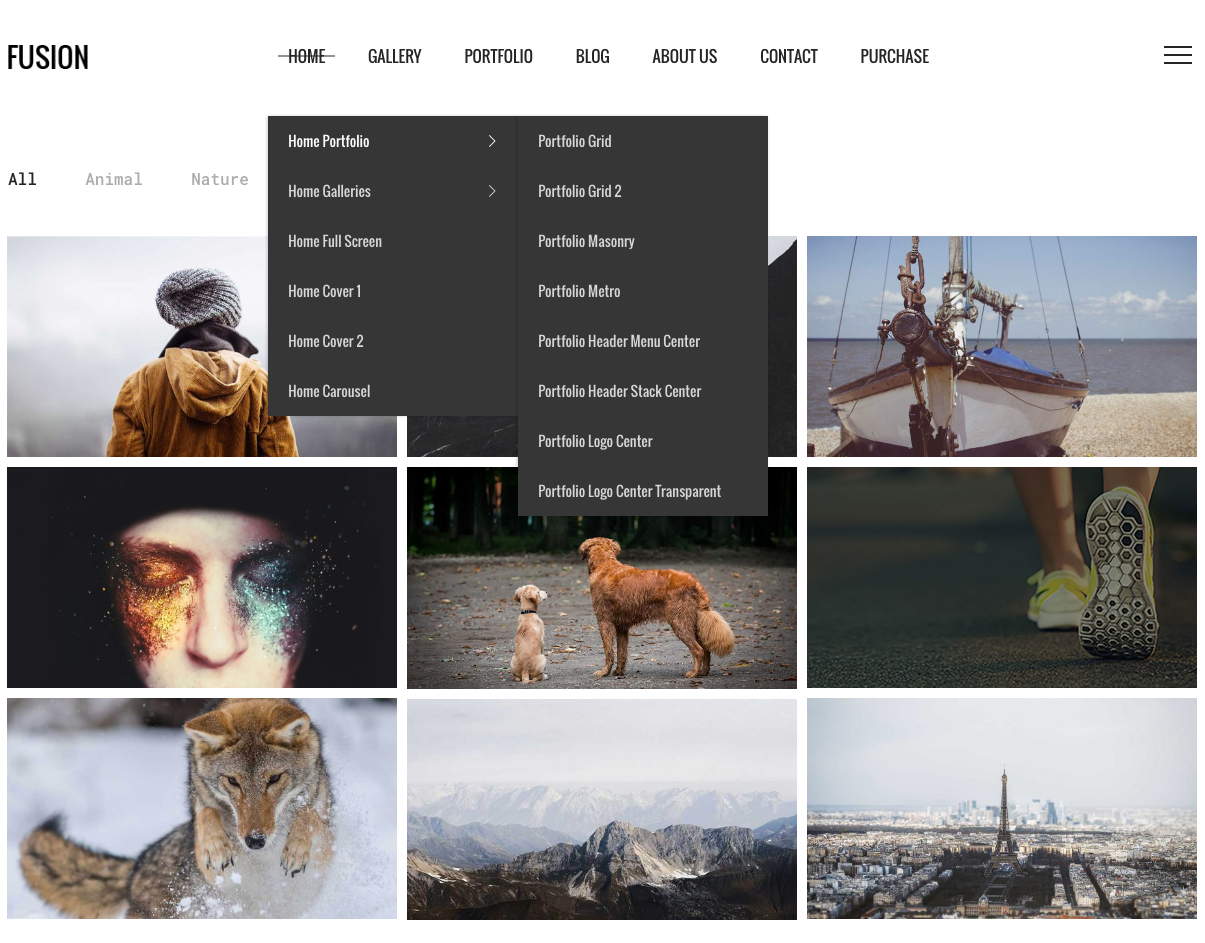
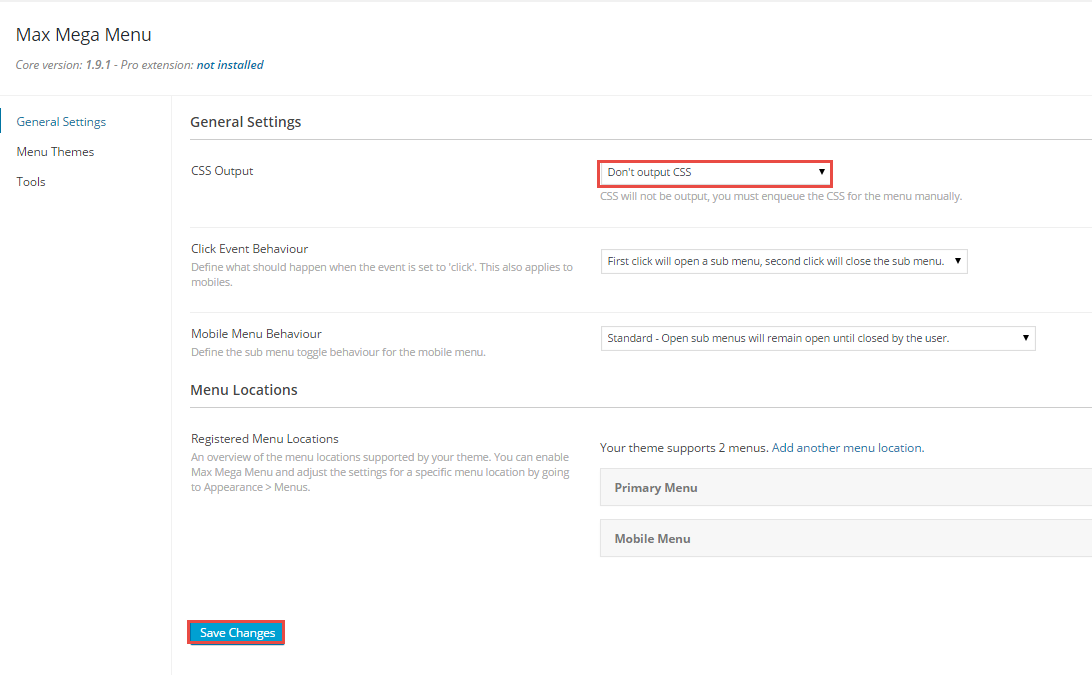
Customizing The Mega Menu Display
CSS Classes are an advanced menu property that allow you to apply a CSS class to individual menu items. To enable customisations for the mega menu dropdown, you'll need to first make sure you have enabled the ability to add custom css classes to your menu items. You can enable this functionality by pressing the Screen Options tab in the top right hand corner of your screen, and then checking the CSS Classes checkbox:
- For more information about Mega Menu please refer Mega Menu Setting
Pages & Posts
In this section you can find all the information needed to create your pages, your blog posts and your portfolio items. Many options for this final destination pages are equal to all of these types.
Simple pages, blog post and portfolio items are usually referred in WordPress as static contents. That means that the information displayed on a page doesn’t change, or doesn’t change often. A great example of a page would be the About or Contact Us section of a website, a simple Blog Post or a Portfolio item page where you showcase your case study. This theme includes several page options to work with. All of this is done in the Page Options section of your page WordPress admin.
To create a new Page, Post or Portfolio you just need to follow this steps:
- Navigate to Pages, Posts or Portfolio in your admin sidebar and click Add New option.
- Input a new name for your page, then find the Page Attributes box on right side.
- Select any number of page options in the Page Options box.
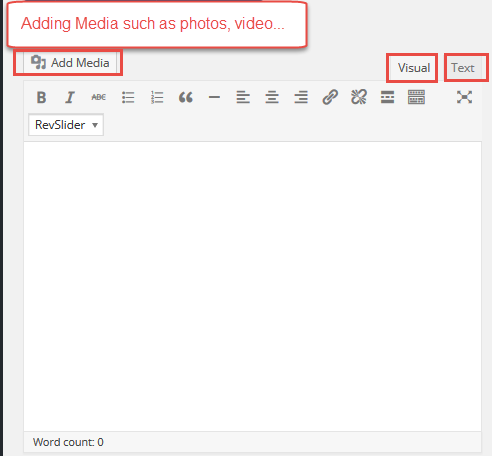
- Content for your page goes in the editing field, use the Visual, Text editor or use the Page Builder for advanced layouts.
NOTES: You must install Virtual Composer to be ensured this theme run extend options and custom page options smoothly.
Add New Page
- Navigate Page > Add New
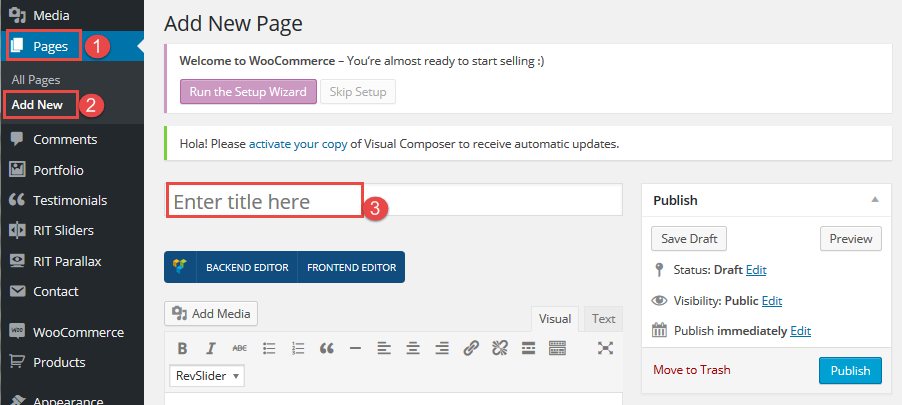
- Input the name for your page
- Select any number of page options in the Page Options box.
- Content for your page goes in the editing field, use the Visual or Text editor. Page content is mainly built using Shortcodes, see the Shortcodes section for how to use them. You can also use our demo content, see the corresponding section of this document for the demo code of each page
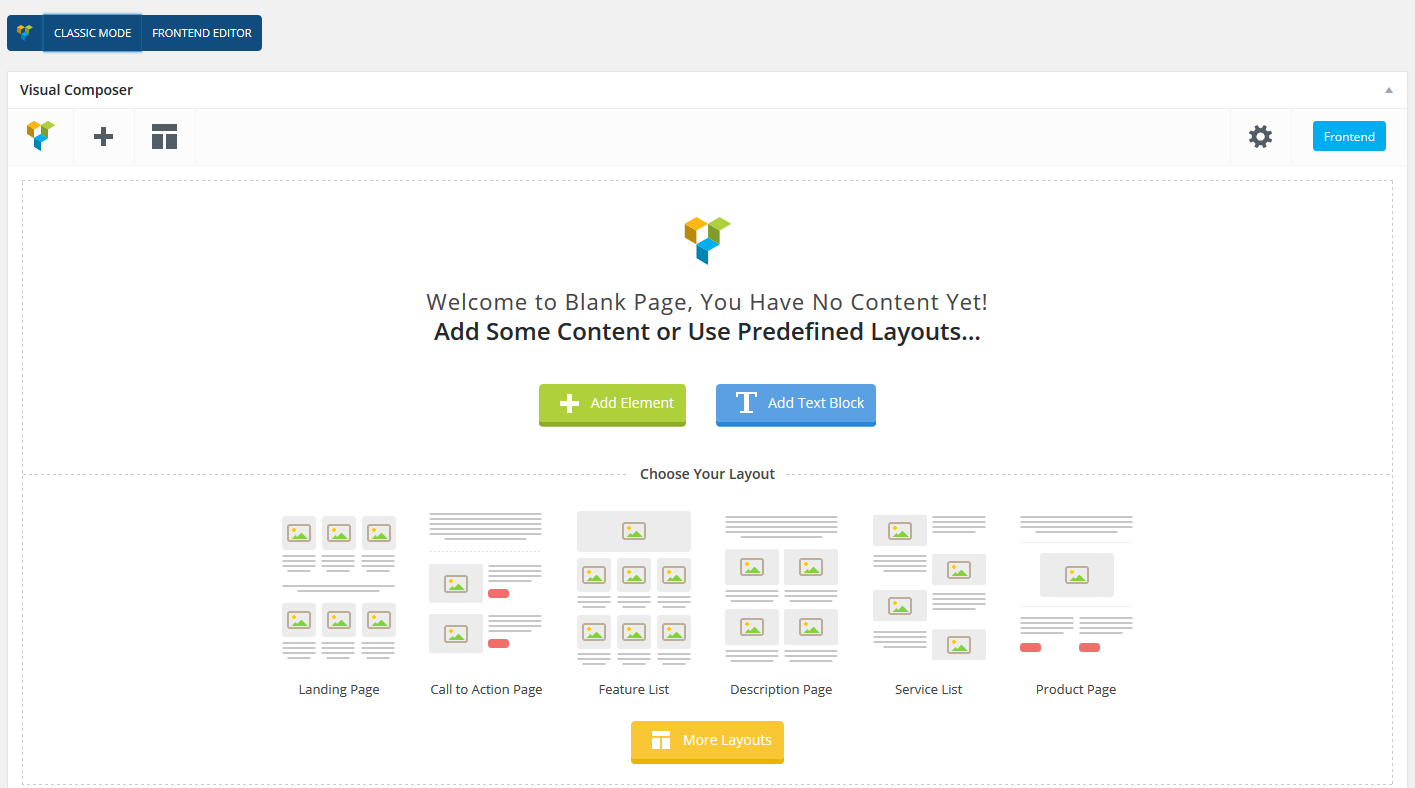
Visual Composer
When use Visual Composer you can find many ways to creat pages through using RIT elements. It will make your pages with full of features and visual friendly. For more advance options, we build more extra options.
- Go to Pages > Add New then choose BACKEND EDITOR
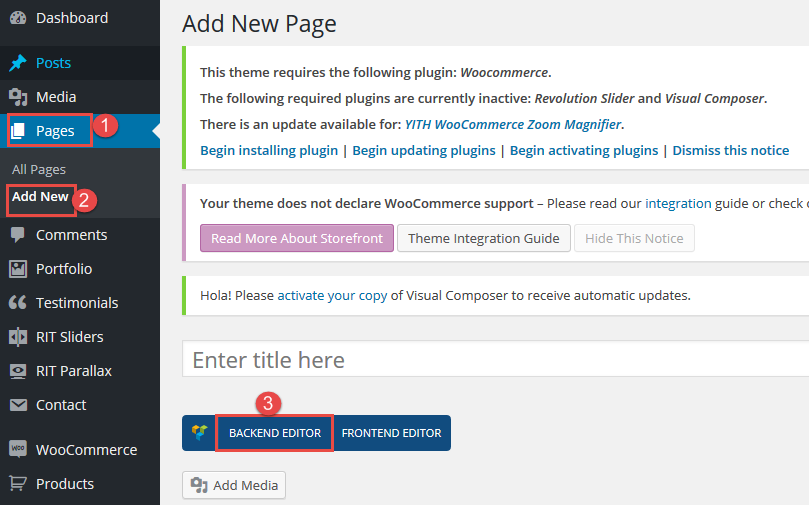
- Here is the place you work with Visual Composer:
- Now choose Add new element and start your editting:
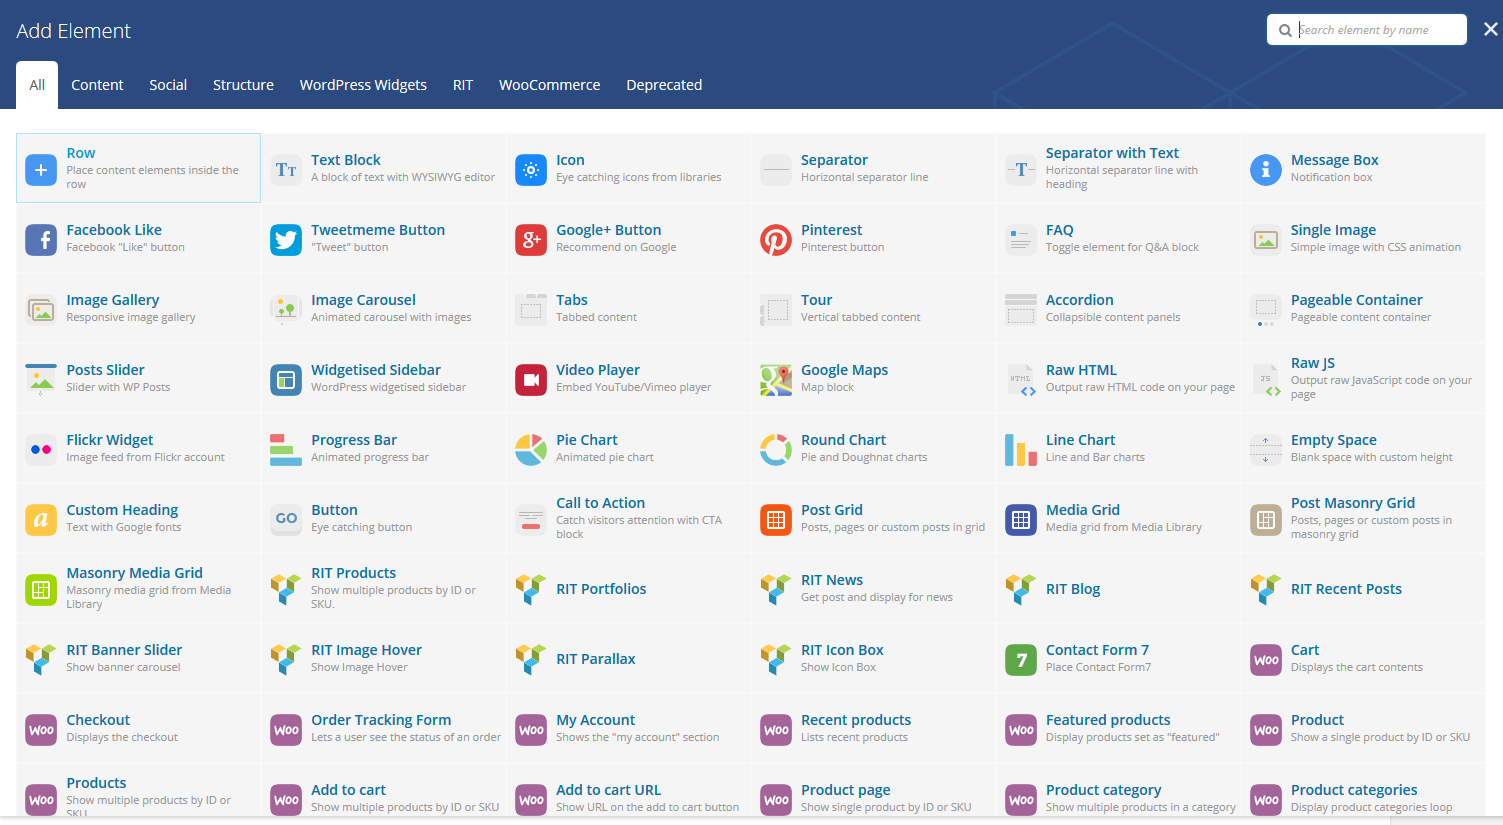
- We have additional options for you to create page, portfolio, page layout and product, which lie in the CleverSoft tab:

Predefined Page Layouts
- All Pages on the Demo Page are created through a combination of shortcodes. You can found their setting in Pages >All Pages.
- The default WordPress themes give you the option to change the page layout on the right hand side of the page you are editing. The default template has one sidebar.
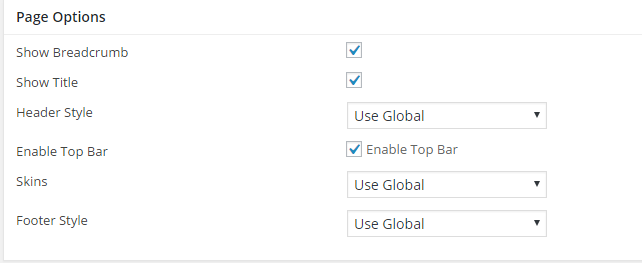
- For each pages you can setting layout by edit Page Attributes, Page Background Options and Meta Options :
- Page Attributes:

- Page Options & Layout Options:
Homepage Settings
By default, your homepage will also display your post feed, listing all of your latest posts for visitors to see. If you would like to instead have your homepage be a static page and your post feed display on a separate page, you can follow these instructions.
First, create your new homepage and blog pages within WP Dashboard > Pages > Add New.
We strongly recommend you to use the 1 Click Demo Importer in order to import our demo home page. Please see the video bellow:
For this tutorial, we will be naming our static homepage "Home" and our post feed page "Blog".
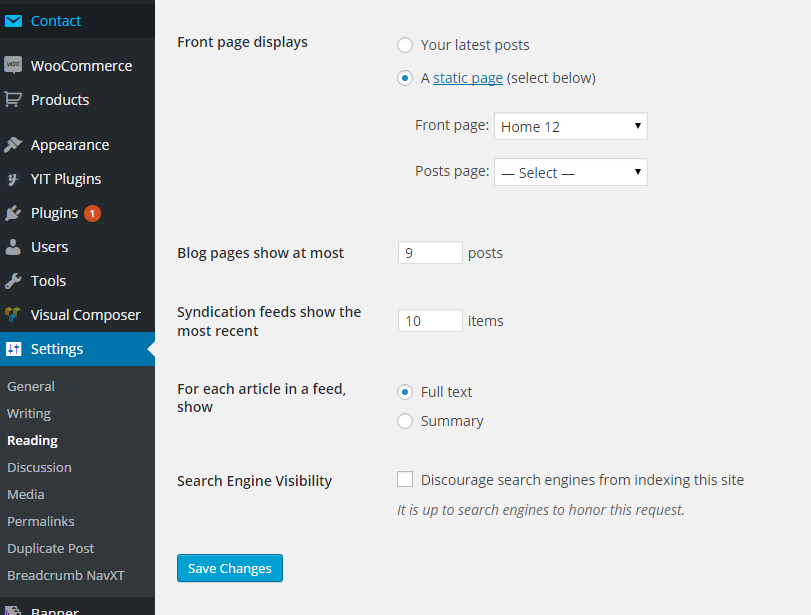
Next, navigate to Settings > Reading. At the top of this screen, you'll see a section titled "Front page displays". Click the little bubble next to the "A static page" option.
From this option's "Front page" drop-down menu, select your newly created "Home" page.
From the "Post page" drop-down menu, select your newly created "Blog" page.

- The Front Page Display setting allows you to choose what content appears on your blog’s front page. You can decide if you want posts, or a static Page, displayed as your blog's front (main) page.
- Front page: Select in the drop-down box the actual Page that you want displayed as your front page.In this case, we choose Home.
- Post Page: Select in the drop-down box the name of the Page that will now contain your Posts. If you do not select a Page here, your Posts will only be accessible via other navigation features such as category, calendar, or archive links.
- Blog pages show at most lets you choose how many blog posts are displayed per page. The default setting is 10 posts per page.
- Syndication feeds show the most recent lets you set how many blog posts will be sent out at once via your RSS feed (located at http://your-domain.WordPress.com/feed/).
- For each article in a feed you can select Full text or Summary. Full text means that the entire contents of a post are included in the feed. Summary means that only the first 55 words are included in the feed, along with the option to continue reading the rest of the post.
- After that Save Changes to apply the changes to your WordPress site.
The last step involves adding your "Home" and "Blog" pages to your navigation menu.
To do so, go to Appearance > Menus. Click the "Pages" drop-down menu on the left, check the boxes next to your "Home" and "Blog" pages, and add them to the menu. Drag and drop them to wherever you'd like them to be positioned in your menu. Be sure to save when finished.

Now, when you refresh your site, your homepage will display your newly created "Home" page and your "Blog" page will now display your post feed.
Blog
Creating a Blog Page
By default Wordpress displays blog posts in front page but this theme uses a static page as its front page. So we'll have to create a new page called Blog and will use it to display the blog posts.
To display your blog posts, you will then need to create a page that includes the Blog, Recent Posts or Posts Carousel page builder asset.
- Navigate to Pages > Add New.
- Enter the title Blog and click on Publish.
Note: DO NOT set the posts page in Settings > Reading, as this will force your page to show the archive layout, and not follow your created page.
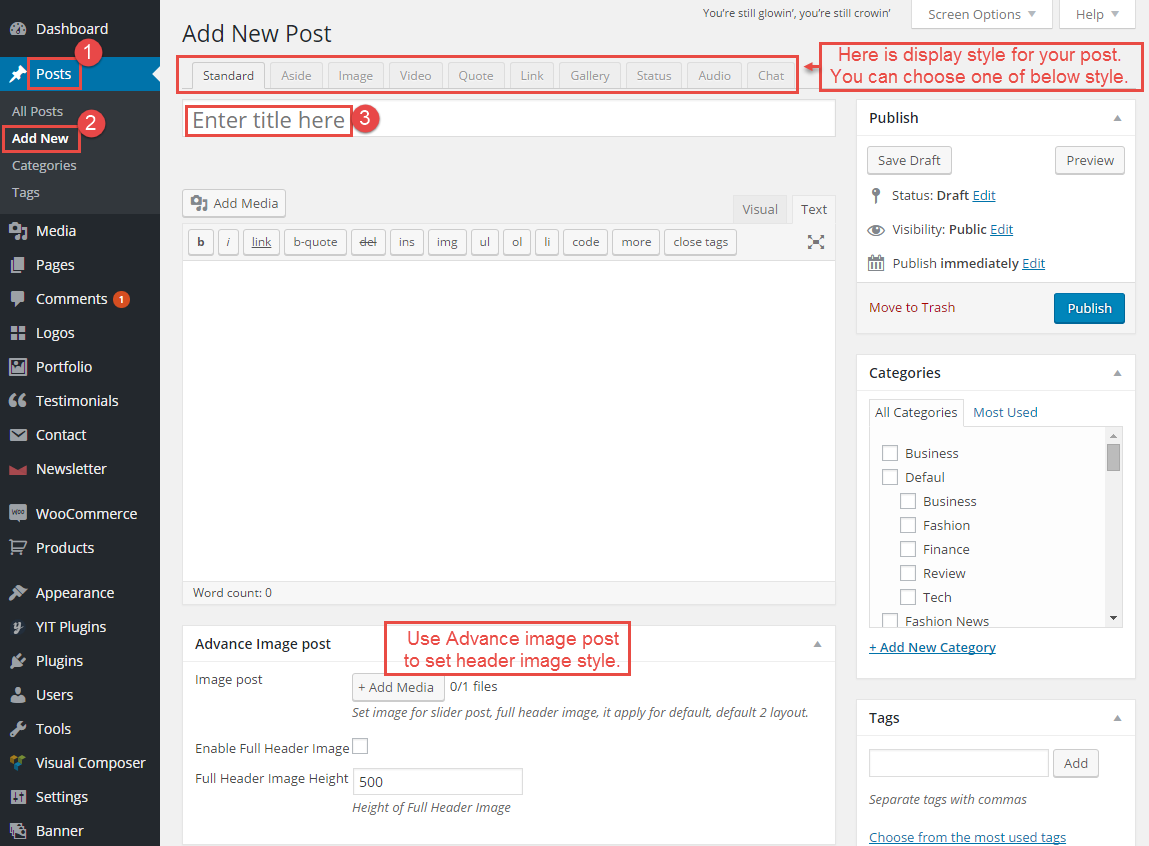
Creating a Post
The Posts menu option on the left is where you add blog posts. To add a new blog post, select the Posts > Add New option from the left hand WordPress menu.
Once you're on the Add New Post screen, you will then be able to set a title for the blog post, add the body content, and also provide all the meta information such as extra details and media. In the blog meta you can set the image for the thumbnail, and also the media type for the detail page.
You can use the Swift Page Builder to create the content of the item, which effectively allows you to have limitless possibilities for what you can display, and also how you can display it. If you do use the Page Builder to create the content, you will want to provide a custom excerpt (can be found in the item meta).
The item meta also contains post slider options, allowing you to set the image for the slide that will show if the item appears in a posts slider, and also the display for the caption.
Shop
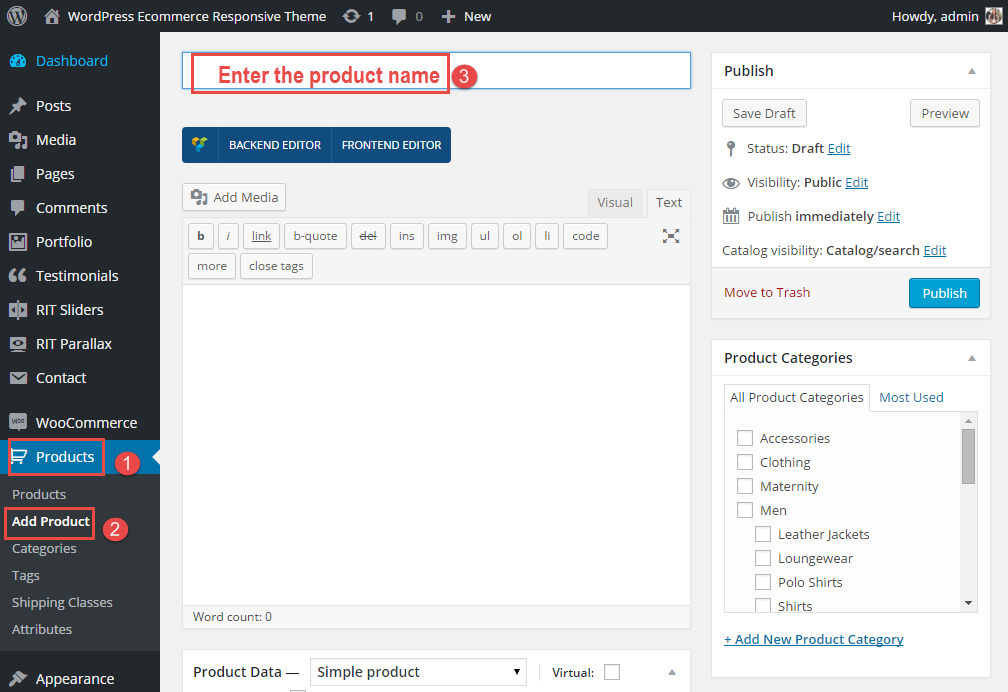
The Products menu option on the left is where you can add and manage products. To add a new product, select the Products > Add Product option from the left hand WordPress menu.
Add A Product
Once you're on the Add New Product screen, you will then be able to set a title for the product item, add the description, and also provide all the data information such as price, stock status, attributes, etc.
- You can add a featured image in the right column box, and above that set any other gallery images. Any images you add here will be used for the product slider images.
Setting A Shop Page
- If you would like to add products within a page that you create using the page builder, you can also use the Products & Products (Mini) assets.
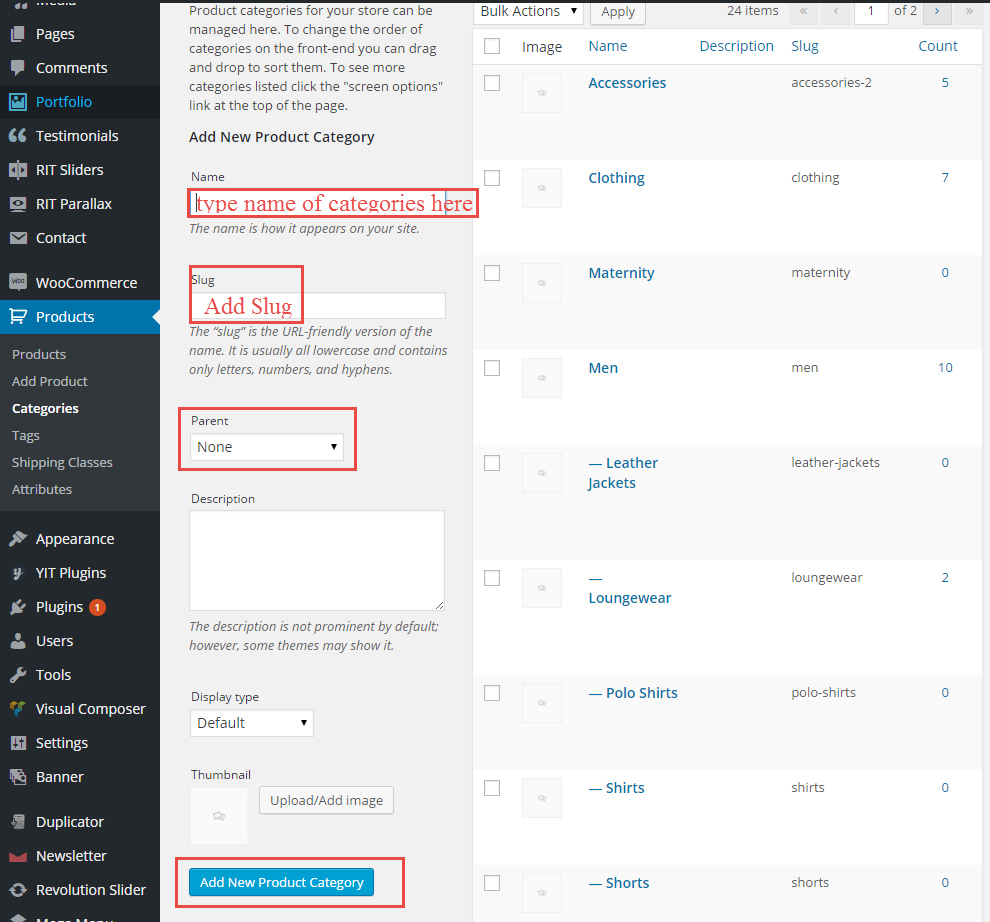
Create a new Category
Creating categories is one of the easiest ways to organize your products. The more products you have, the more benefit you will receive by organizing into multiple categories. What do categories do? They allow your customers to easily sort and navigate your products.
- To set up your product categories, click the Categories link under Products Menu in your WordPress Dashboard.
Language Translations
All of our Themes are able to be translated into any language. The process of translating the theme is a user responsibility. In this case, we recommend that you use the very popular WPML plugin.
To translate the static strings, if you aren't using WPML then I recommend downloading POEdit (or any Text Editor: TextWrangler, TextEdit, NotePad++). Once you have installed please follow the steps below:
- Open the /wp-content/themes/ri-ione/languages/ folder and duplicate the en_US.pot file, then rename it to your desired language code. For example; for German you need to re-name it as de_DE.pot for Spanish es_ES.pot for Turkish tr_TR.pot etc. You can find all the codes from this link http://codex.WordPress.org/WordPress_in_Your_Language.
- Then you will need to open the .pot file in POEdit. Once opened, you will see all strings that needs to be translated. Type the translation of a string into the "Translation" column. Do not delete or edit "Original string" part.
- When you finish translating, save the file. This will create an .pot file in the same directory.
- Upload the new files into the languages folder of the theme /wp-content/themes/ri-ione/languages/ and then follow this guide: http://codex.WordPress.org/Installing_WordPress_in_Your_Language#Single-Site_Installations
In order to keep your translation after each theme update, please send us the two files (MO and PO) and we will bundle them with the theme.
Credits
- Wordpress by WordPress.org.
- WooCommerce by WooThemes
- Slider Revolution by ThemePunch
- Visual Composer by WPBakery
- YITH WooCommerce Wishlist by yithemes
- Contact Form 7 by Takayuki Miyoshi
- Envato Toolkit
- Bootstrap by Twitter
- Jquery Easing by George McGinley Smith
- Owl Carousel by OwlFonk
- WOW by Matthieu Aussaguel
- Font Awesome by Dave Gandy
- TGM-Plugin-Activation by Thomas Griffin
Troubleshooting
Update Theme
Why do I have to update Rit-core and how to update it?
Answer:
We have many changes in rit-core everytime theme update is available. It will be noticed by theme forest. Once theme update is released, it will be used with up-to-date plugins, such as Visual Composer, rit-core, Revolution slider... Rit-core is required to be updated to get rid of conflicts:
In order to update Rit-core, please follow these steps:
Back up your customization by export and import customizer. Read more information about this from Customizer Import
Go to Plugins > Installed Plugins then you will see Update required for RiverTheme Core
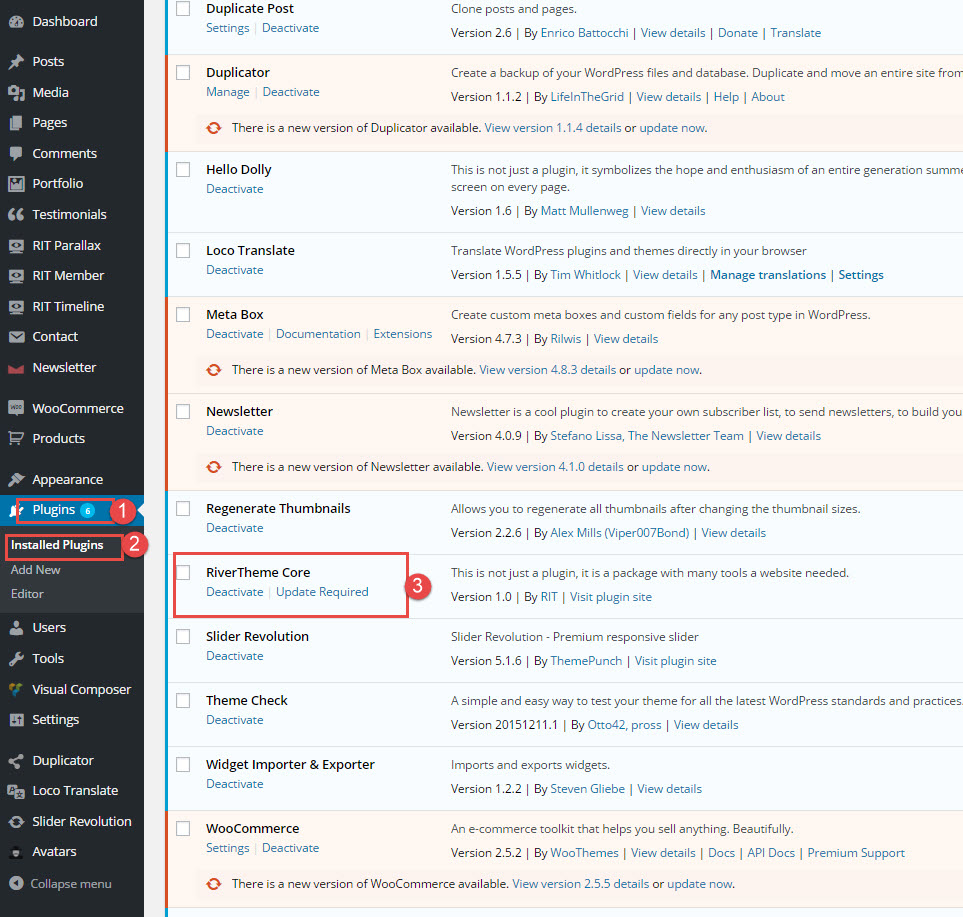
- Click to update required RiverTheme Core then you can see version available
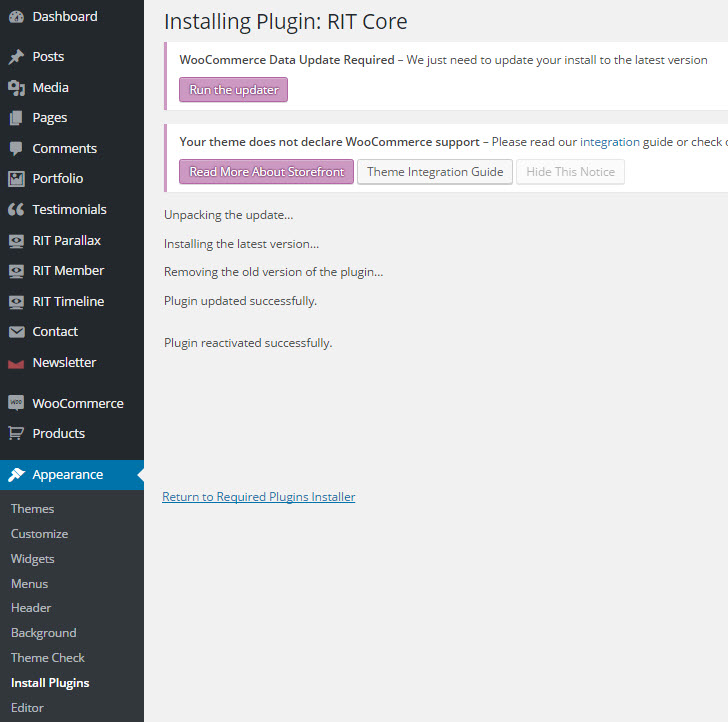
- Click on Update to install the lastest version plugin then wait for this message:
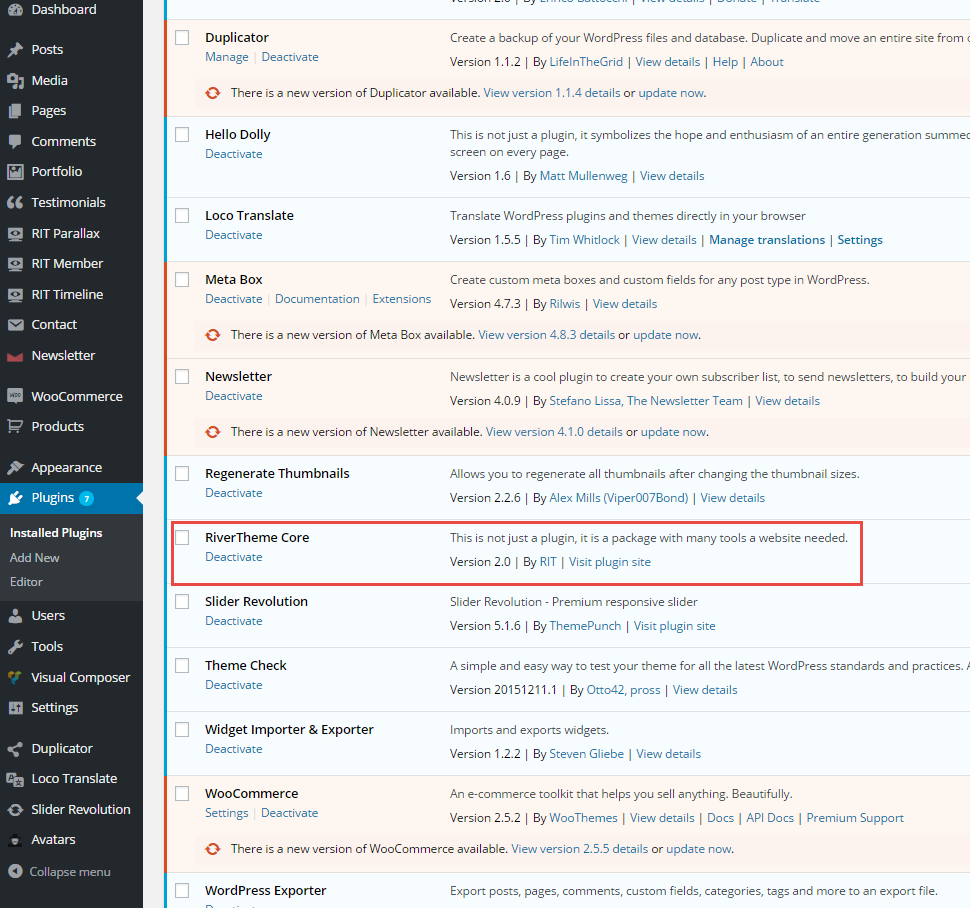
- After that, you can reload or go to Plugins > Installed Plugins and you can see the version updated:
Visual Composer / Slider Revolution — Cannot update, asking for License Activation
Question:
I'm trying to update the Visual Composer / Slider Revolution, but I receive this error message "To receive automatic updates license activation is required. Please visit Settings to activate your Visual Composer."
If I try to activate Visual Composer I get the message "It seems that you do not have any valid license for Visual Composer. What does it mean? It may be so that you got Visual Composer by purchasing WordPress theme which does not grant you with direct license for Visual Composer."
What do I have to do?
Answer:
Since Visual Composer is coming as a bonus / free with the theme, users don't get to have their own purchase codes, but it's not required, assuming you need it to be able to update the plugin. The option to activate a license was left open for those who already have a license. We always make sure to include the latest version when we release theme updates, so go to this section "Update Plugin" to know how to you update the plugins coming with the theme.How to speed up your theme?
Our support team often gets asked questions such as "How to speed up my website, the theme's demo is much faster, what plugins are you using?".
A site can get to be slow for many reasons, from server and domain setup, to bad plugins or themes, image sizes, etc. From the theme's perspective, we've been able to achieve great results with Ri iOne so the theme should help you in your mission of optimising your site for better performance.
After valuable user feedback, extensive research and testing, we spotted several opportunities to make Ri iOne faster and more efficient. The goal was to keep the theme and its code as clean and fast as possible while packing the same awesome features people love without slowing things down. By minifying JavaScript and CSS code, we managed to improve performance and speed up page loading, making both visitors and search engines happy.
We use the following plugins to get the best of Ri iOne in terms of performance and loading times.
- WP Super Cache (default settings)
- Better WordPress Minify (default settings)
- Stone HTML Compressor (no settings)
Beside Server Caching, Minifying and HTML compression, we've also made sure the Browser Caching is enabled for the site by adding the following lines in the .htaccess file.
# Leverage Browser Caching by setting HTTP header expires
<IfModule mod_expires.c>
ExpiresActive On
ExpiresByType image/jpg "access plus 1 year"
ExpiresByType image/jpeg "access plus 1 year"
ExpiresByType image/gif "access plus 1 year"
ExpiresByType image/png "access plus 1 year"
ExpiresByType text/css "access plus 1 month"
ExpiresByType application/pdf "access plus 1 month"
ExpiresByType text/x-javascript "access plus 1 month"
ExpiresByType application/javascript "access plus 1 month"
ExpiresByType text/javascript "access plus 1 month"
ExpiresByType application/x-shockwave-flash "access plus 1 month"
ExpiresByType image/x-icon "access plus 1 year"
ExpiresDefault "access plus 30 days"
</IfModule>
A quick test on the shop catalog page with the settings above returned the following results:
- Pingdom Results: Load Time: 812 ms / Requests: 62 / Page Size: 1.3 MB
- Web Page Test Results: Load Time: 2.541 ms
Hope you'll be able to use this info to speed up your site too. Remember that each setup is different and it depend on your content, the plugins you're using, the server that hosts your site and basically all that's involved with it. If you're looking for professional help in this matter, there's always someone available for such tasks on the Envato Studio. Pricing and timeline are always straightforward there and that's the main reason for recommending it.
Change Log
------------ 1.1.2 Release Dec 26, 2016  ------------

* Fix issue that label sale of variable product show incorrect value
* WooCommerce 2.6.11 compatibility

------------ 1.1.1 Release Dec 09, 2016  ------------

* Fix issue that image not changed when selecting variable
* Upgrade Layered Navigation to latest version

------------ 1.1.0 Release Dec 06, 2016  ------------

* Add Zoom feature for the product page

------------ 1.0.9 Release Nov 23, 2016  ------------

* Upgrade Visual Composter to latest version
* Upgrade Revolution Slider to latest version

------------ 1.0.8 Release Nov 18, 2016  ------------

* Improve style for Layered navigation (Shop sidebar)

------------ 1.0.7 Release Nov 17, 2016  ------------

* Add new home Lookbook

------------ 1.0.6 Release Nov 15, 2016  ------------

* Improve typography
* Update sample data

------------ 1.0.5 Release Nov 10, 2016  ------------

* Add home dark style

------------ 1.0.4 Release Nov 03, 2016  ------------

* Improve style for the product page: now it's loading more smoothing

------------ 1.0.3 Release Nov 02, 2016  ------------

* Add 3 new layout for product page: Horizontal gallery, Sticky and Carousel
* Improve Mega Menu's style


------------ 1.0.2 Release Nov 01, 2016  ------------

* Add Mega Menu
* Improve styles

------------ 1.0.1 Release Oct 28, 2016  ------------

* Fix minor css issues

------------ 1.0.0 Release Sep 26, 2016  ------------


! Initial Release